Use the canvas, guides, and shortcuts
The canvas is the physical face or back of a game piece. Its size controls the output and print calculations, so choose the piece format before arranging the final layout.
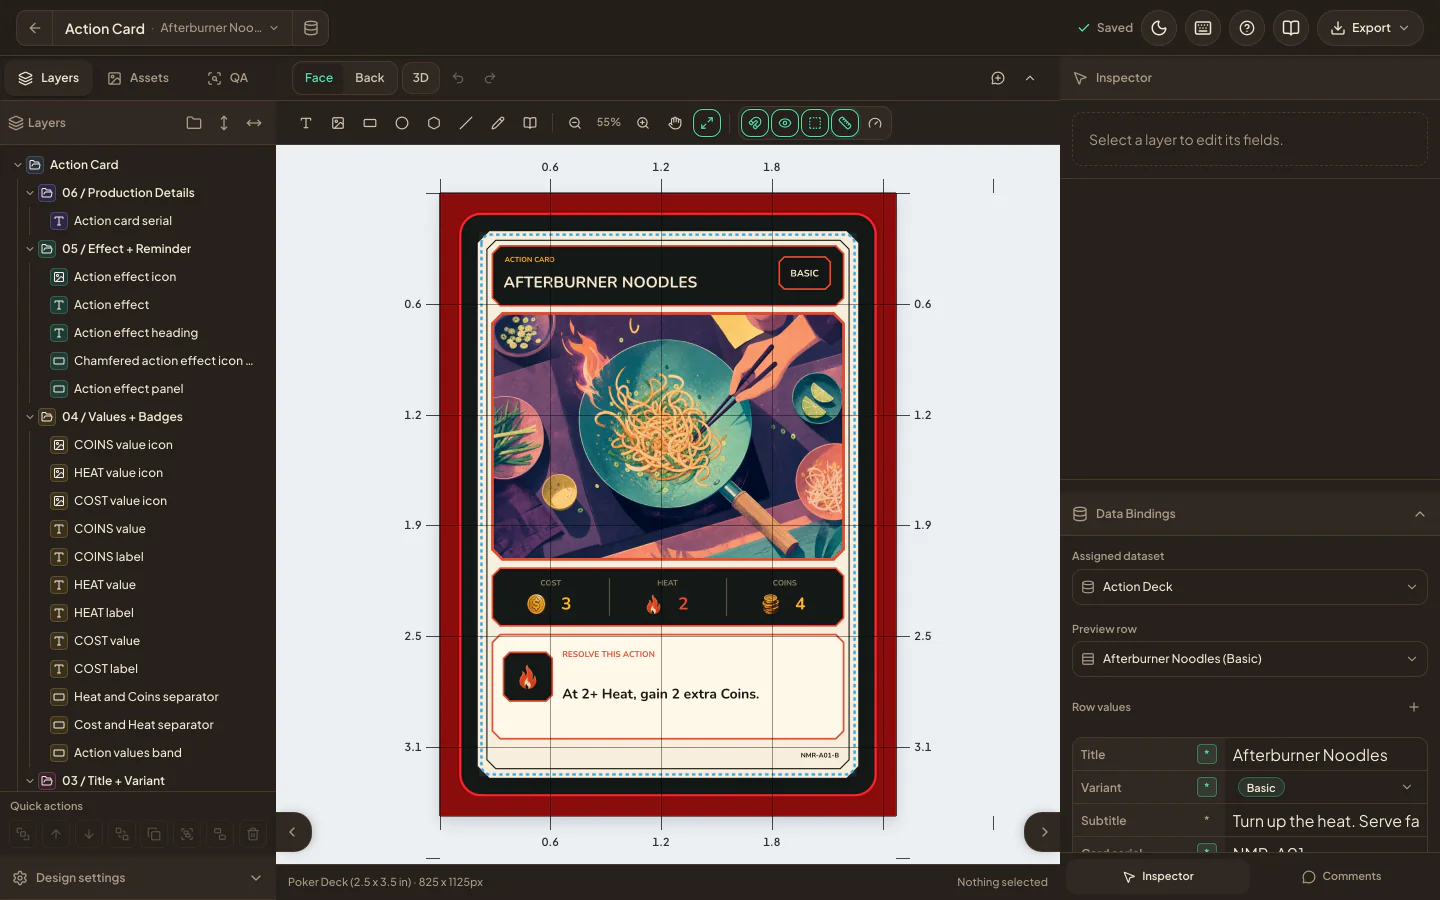
Place and select layers
- Click a layer on the canvas or in the Layers panel to select it.
- Drag to move it. Use the inspector when an exact position or size matters.
- Shift-click (or Ctrl/Cmd-click) to select several layers, then move, align, distribute, group, or transform them together.
- Right-click a layer for actions such as duplicate, group, lock, hide, effects, and changing its stack order.
- Use Bring forward, Bring to front, Send backward, and Send to back to control overlaps.
Open the sidebar's Assets tab to add game images, icons, or shared Library items. Drag an item to its intended canvas position, double-click it, or focus it and press Enter or Space.
Text can wrap within its box or follow a curve with the Curve effect. Shape tools create rectangles, ellipses, polygons, and lines. Rectangles and images can have round, square, chamfered, or notched corners, and shape outlines can be solid, dashed, or dotted. To bend a line, right-click it and choose Add bend, or use Bend preset in the inspector; Reset straight removes the bend.
The selectable frame of an image includes transparent padding, so you can still select artwork with faint or empty edges. Resize an image freely to make it fill the new frame with Stretch. Hold Shift while resizing to preserve its proportions and current fit.
Align and measure
Use the view controls to turn on snapping, guide lines, print margins, and Canvas size. Canvas size can show ruler ticks in millimetres or inches, a square grid, mouse coordinates, and a crosshair without changing the design. Add horizontal or vertical guides from the snap menu or the Layers panel, then drag them into place for repeated edges.
Keep important text and icons inside the safe area. Artwork intended to bleed should extend beyond the cut line.
Manufacturer formats can also show an official, surface-specific overlay for bleed, safe, fold, and irregular cut areas. Switch between the product's artwork surfaces to check each one. Complex contours may contain concave edges, holes, or separate printable islands; do not replace them with a rectangular guide. See manufacturer presets and product surfaces before preparing final files.
Work quickly
Selecting layers opens a quick-action shelf beside the selection. With one layer selected, it shows that layer's most-used controls, such as font size and alignment for text, Edit image and Fit for an image, or stroke width for a shape, plus Effects and More. With several layers selected, Align offers left, horizontal centre, right, top, vertical centre, and bottom alignment, Distribute makes horizontal or vertical gaps equal, and Spacing sets an exact gap between them. Actions that need more layers stay disabled and explain why.
The snap menu has All targets, Guides and canvas, Canvas only, and Off presets. Hold Shift while moving a layer to ignore snapping temporarily.
Curved text also snaps by the centre of its circle. Drag text that uses the Curve effect over a round shape, token, or icon and it locks on when the two share a centre, so a title can run around a ring without lining it up by eye. To change how tightly the text wraps, change its font size or Curve degrees, then drag it once more to snap it back.
The shelf and Designer export menu also provide quick access to duplication, grouping, layer order, visibility, locking, 3D preview, a PNG of the current side, face-and-back PNGs, and the full Export workspace. The keyboard shortcuts shown in menus are the source of truth for your operating system. Common actions include undo, redo, duplicate, group, ungroup, delete, copy, paste, zoom, and moving selected layers with the arrow keys. Single keys add layers (T text, I image, R rectangle, O ellipse, P polygon, L line), S turns snapping on or off, and holding Space or pressing H lets you drag the view. Press Ctrl/Cmd + / to open Keyboard shortcuts for the full current list, where you can also change them.
Hover Undo or Redo to see the history list. Each step shows when it happened, such as 5 min ago, Yesterday, or a date for older steps; hover the time for the exact date and time. Choose a step to undo or redo everything up to it.
Press C to place a Designer comment, or Shift+C to open and close the Comments panel. You can also right-click a canvas position and choose Leave comment here.
For a large design, collapse groups you are not editing. The Canvas performance menu can simplify demanding interactions; return to its default settings before checking generated pieces.
Use a touch screen or the keyboard
On a tablet or phone:
- Drag with one finger on empty canvas to move the view, pinch with two fingers to zoom, and tap empty canvas to clear the selection.
- Press and hold a layer, or its row in the Layers panel, to open the same menu as a right-click. Press and hold a toolbar button to see its name.
- Turn on Select multiple in the quick-action shelf to add layers to the selection with taps.
- Press and hold Undo or Redo to choose a step from the history list.
- On a tablet, one side panel sits beside the canvas at a time; on a phone, the canvas, Layers, and Inspector each fill the screen. Use the Show layers panel and Show inspector tabs at the sides to switch. On a phone, the theme, keyboard shortcuts, Designer guides, and Expression examples move into More options in the header.
Without a mouse:
- Press
Tabto reach the canvas. Use the arrow keys to nudge the selection (holdShiftfor larger steps),Enterto edit selected text or an image, andEscapeto clear the selection. - Press
Shift+F10or the Menu key to open the selection's menu, or Leave comment here when nothing is selected. - In the Layers panel, use the arrow keys,
Home, andEndto move through layers and groups,EnterorSpaceto select, andF2to rename. A layer's menu includes Move to for putting it in a group without dragging. - The main toolbar is one
Tabstop: use the arrow keys to move between its controls, and the down arrow to open a toolbar menu such as print margins or canvas size.
Draw freehand marks
Press B to open the Draw shelf at the left of the canvas. Hover or focus a pen tip to see its name. Choose Pencil, Pen, Marker, Highlighter, Brush, or Eraser directly. Open the stroke sample to browse the Stroke library, including Charcoal, Fountain, Felt tip, Dry brush, Watercolor, Spray, Stipple, Hatch, and Ribbon. Each style has its own ink, texture, or pattern; set the colour, opacity, and brush size below the pen tips. Sizes are document pixels from 1 to 128; use the number field, slider, quick-size menu, or [ and ] to adjust the active size. Press Escape to leave Draw mode.
Open Advanced brush settings for smoothing, stylus-pressure input, hardness, and flow. The Eraser control can remove sampled segments or whole strokes. On a touch screen, fingers draw until you use a stylus; after that, the stylus draws and fingers move the view. Turn Draw with finger on or off in the same settings to choose for yourself. Each completed freehand mark is one undoable gesture, so Undo removes the complete mark and Redo restores it.
Drawings remain part of the design when you switch rows or sides. Check them in the flat canvas, preview, and Export QA before preparing final files.
While Draw is active, press [ or ] for smaller or larger brush and eraser tips. Hold Shift for 10-pixel steps; sizes stay within 1–128 pixels. Press E to toggle the eraser and B to return to drawing. These drawing shortcuts are listed in Keyboard shortcuts, and the size and eraser shortcuts can be changed there for both the Designer and the Scratch Pad. Typing in a field keeps its normal behaviour.
Click or start drawing on the canvas to close brush popovers immediately; scrolling or zooming over the canvas also dismisses them. Escape closes an open brush popover first, then leaves Draw on the next press.
You can change tip size with the bracket shortcuts while holding the mouse or stylus down. New marks use the new size; earlier marks retain their width, and the whole gesture remains one undo step. Switching brush styles keeps the current size.
Each side allows 100 normal layers and 500 drawing strokes, counted separately. Existing artwork above either limit remains editable and can be reduced. Splitting a stroke with the segment eraser creates additional strokes, so the complete erase must fit the drawing allowance. Whole-stroke erasing frees slots.