Add shadows, glows, and other effects
Effects are non-destructive: they change how a layer or finished side is rendered, not the original image. Their order matters because each effect receives the result of the one above it.
Choose the right scope
- Image appearance changes the pixels of an image layer: adjustments, photo filters, and image effects such as blur, tint, colour overlay, and texture. Fit, position, and corners are set on the image layer itself, and Edit image also crops it.
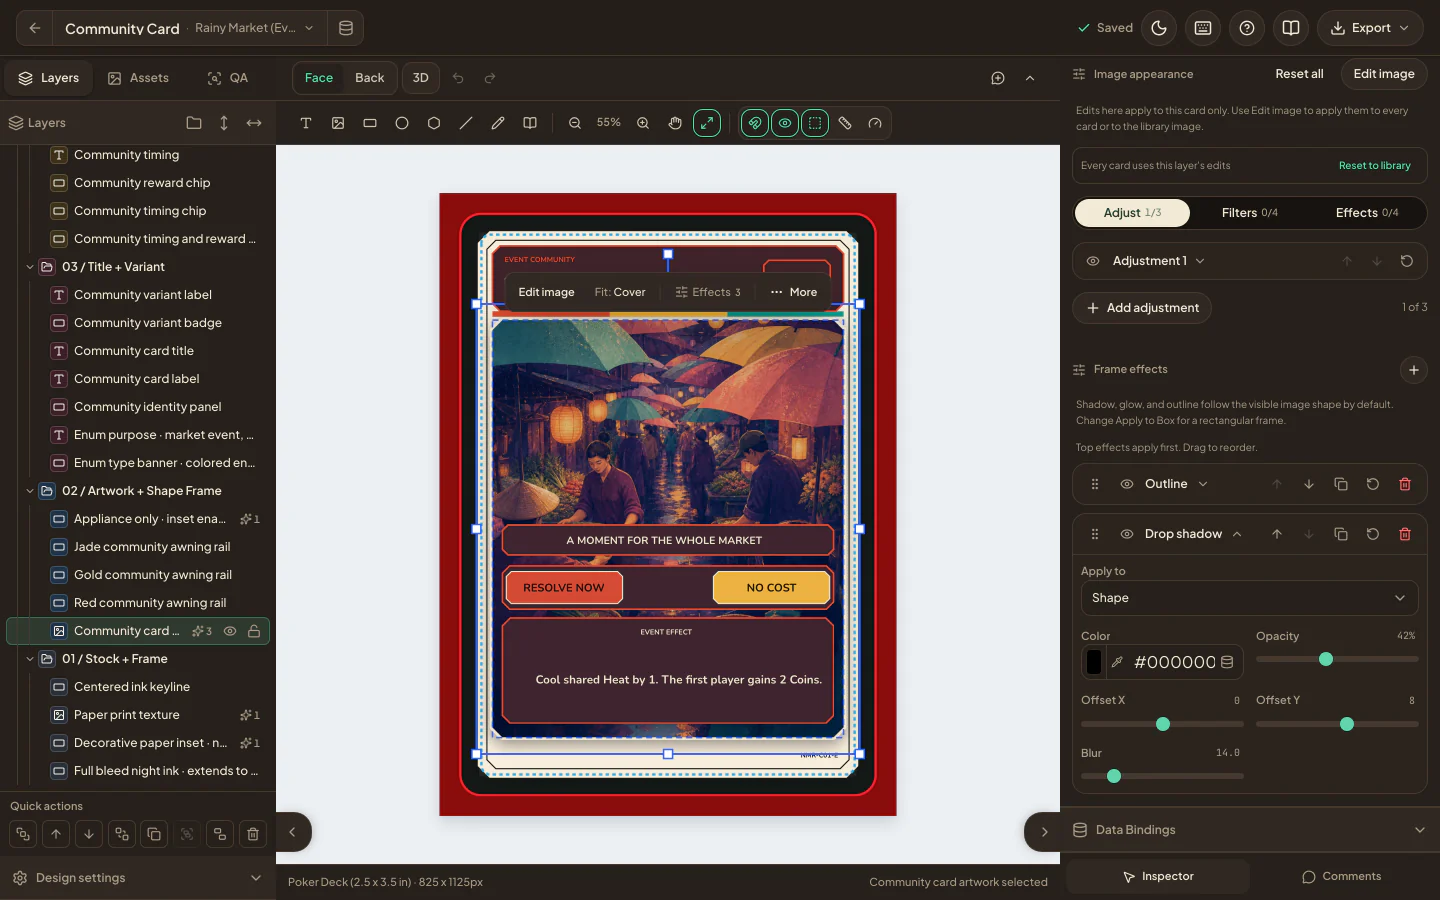
- Layer effects travel with one layer. Use them for a drop shadow, inset shadow, outline, or glow that belongs to that object; text and shapes can also be blurred, and text can follow a Curve. On an image layer they are listed as Frame effects. Groups are organisational and do not have their own effect stack.
- Whole-side effects run after all layers on the face or back are combined. Find them as Design filters in Design settings below the Layers panel, and use them for a consistent colour adjustment, tint, or colour overlay.
While you edit, artwork and effects that extend past the edge can remain visible around the piece, which makes soft shadows and glows easier to judge. Preview and export clip the finished result to the physical piece boundary.
Some effects use the visible image pixels, while others use the layer frame. That distinction is noticeable when transparent artwork has padding around it.
Build an effect stack
- Select a layer, or open Design settings for the whole face or back.
- Add an effect from the relevant inspector section: Add effect in Effects, Frame effects, or Design filters, or a tile in Image appearance.
- Adjust it while viewing both a typical dataset row and an edge case.
- Drag effects or use their move buttons to reorder them, or temporarily disable one to compare the result.
- Preview at the intended output size.
Available treatments include Gaussian, motion, and radial blur; drop and inset shadows; outlines; glows; colour overlays; colour adjustments; photo filters; tints; texture fills; and curved text. Image-pixel effects apply to the visible artwork. Layer-frame effects can follow the visible Shape or the rectangular Box. Whole-side effects are limited to colour adjustment, tint, and colour overlay. A layer-effect stack holds up to 12 effects.
For a quick change, right-click a layer: you can add a drop shadow (and, on an image, adjustments, a photo filter, or blur), turn all its effects on or off, or clear them.
Image appearance has three tabs. Adjust changes brightness, contrast, saturation, temperature, and vignette; More controls adds highlights, shadows, tint, hue, sharpness, and invert. Filters add named looks such as Vivid, Warm Print, Vintage Stock, Mono Press, Sepia, Duotone, Halftone, Posterize, Film Grain, and Glitch. Effects adds blur, tint, colour overlay, or texture. One image holds up to three adjustments, four filters, and four effects. In the Add effect menu for layer effects, presets such as Crisp keyline, Raised frame, Recessed panel, and Soft artwork lift provide a useful starting point that you can still edit.
Image appearance edits made in the inspector apply only to this layer, or only to the current card when the image comes from a dataset column, so the library image stays unchanged. The line above the controls shows where the current look comes from: this card's own edits, this layer's edits, the library image's saved edits, or the original image. Its reset action (Reset this card, Reset to library, or Reset to original) removes the override so the next one applies again.
Choose Edit image for a larger editor with a live preview, Compare, and Crop. Use Save to to choose where the edits go: This layer, This card or Every card for a dataset image, or Library image to update the image in every design that uses it. Placements with their own edits keep them unless you also reset them. Save as file can instead bake the result into a new library image and leave the original unchanged.
Read the controls
- Apply to Shape follows visible pixels or text. Box uses the layer's rectangular frame.
- Opacity controls strength. Offset X/Y moves a shadow or texture. Blur or Radius softens it. Spread or Width expands it.
- Blend changes how an effect mixes with the artwork beneath it.
- Colour adjustment changes brightness, contrast, saturation, temperature, vignette, and, under More controls, highlights, shadows, tint, hue, sharpness, and invert without altering the source image.
- Drag effects to reorder them. The top effect runs first; use the eye control to compare it without deleting it.
Prefer a small, intentional stack. Repeated decorative detail is usually easier to maintain as one image, a referenced design, or a grouped set of layers.